
Zendesk integration with Easiio webchat form using node.js
Zendesk is customer support, sales, and ticketing system service that is very popular in customer support fields. In customer sales and support, organizations use call center software and web chat as communication tools with customers. When customers contact an organizations, support, or sales team use a call center or webchat tool with customer management software, such as the ticketing system from Zendesk, together to complete the support tasks and keep track of the customer requests. Zendesk provides many API for integration with third-party applications such as communication tools.
Most of the call center or contact center applications has integration with CRM applications and ticketing systems such as SalesForce, HubSpot and Zendesk, etc. But their integration is normally internal to their application as out of box integration components.
Easiio provides a cloud call center and website chatbot and live chat service. It has integration with CRM like most of the call center applications. Besides the out of the box integration components, Easiio also provides API to allow a developer to quickly develop their own integration. In this example, we will show how easy it is to create a Zendesk integration using the Easiio Web chat, Zendesk HTTP API, and node.js.
1. Easiio Web Chat Form
Easiio web chat support many advanced features including custom forms that user can define their own. To use a Easiio web chat form, it normally takes following steps.
- Create an ITR form
- Configure the form fields according to the requirement
- In the Visual IVR configuration. Use the form in one of the ITR gather menu option.
- In the ITR configure the form, configure the "Data url" field to point to the right API.
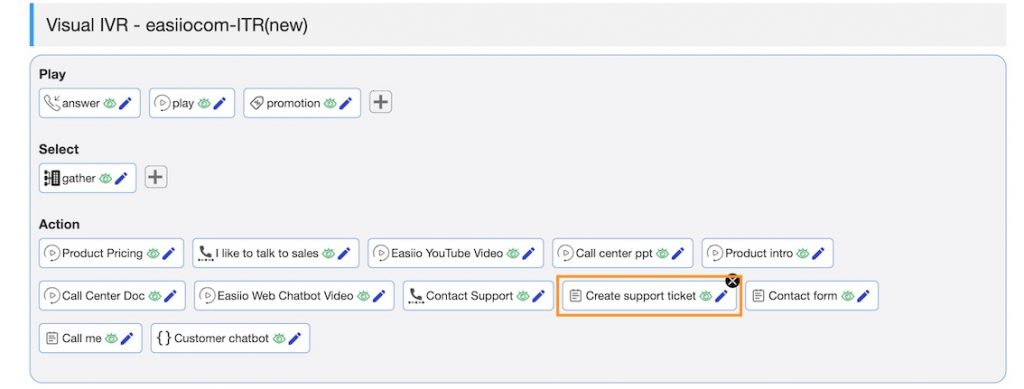
In this tutorial, we will use the Easiio webchat custom form to do Zendesk integration. Users can create an Easiio form using the backend "IVR form" menu to create a custom form. Here we just use the form already created, called "Zendesk Ticket". It has only two fields "Subject" and "Comment". The following picture shows the gather menu item "Create support ticket" that uses the "Zendesk Ticket" form. You need to sign up for a free Easiio account to get this screen (Advanced Configuration -> Visual IVR-> Edit).
2. Configure the web chat form
Click the Edit button of the "Create support ticket" item to edit the form details, including the "Data url". The "Data url" field determines where will the form data will be sent to after the user submits the form. In this case, we submit the form data in JSON format to the node.js API. We will implement it in the next section. See the form below.

3. Write the node.js Zendesk API
In this section, we implement the Zendesk integration API for our form. It will parse the JSON send from the Easiio Web chat and create a new ticket on Zendesk using the Zendesk HTTP API. The code section below show how it is done.
   if (request.url.indexOf ("/zendesk_ticket_create") >=0 ) {
      var requestBody = '';
      request.on('data', function(data) {
        requestBody += data;
        if(requestBody.length > 1e7) {
          response.writeHead(413, 'Request Entity Too Large', {'Content-Type': 'text/html'});
          response.end('<!doctype html><html><head><title>413</title></head><body>413: Request Entity Too Large</body></html>');
        }
      });

      request.on('end', function() {
        console.log("post info:", requestBody);
        var formData = JSON.parse( requestBody );

        if (formData == null || formData.subject == null  || formData.comment == null) {
          response.write('[ { "id": 1, "action": "play", "text": "missing subject or comment" }]');
          response.end('');
          return;
        }

        var request1 = require("request");

        var queryObject = url.parse(request.url,true).query;
        if (queryObject == null || queryObject.user == null || queryObject.pass == null) {
          console.log("zendesk 1.0.1 request url missing username or password");
          response.write('[ { "id": 1, "action": "play", "text": "The zendesk create ticket failed request url missing username or password" }]');
          response.end('');
          return 0;
        }
        var remoteurl = "https://" + queryObject.user + ":" + queryObject.pass + "@" + queryObject.domain + ".zendesk.com/api/v2/tickets.json";

        var options = {
            method: 'POST',
            url: remoteurl,
            headers: {accept: 'application/json', 'content-type': 'application/json'},
            body: {
              "ticket":
                {
                  "subject": formData.subject,
                  "comment": {
                    "body": formData.comment
                  }
                }
              },
            json: true
          };

          request1(options, function (error, response1, body) {
            if (error) throw new Error(error);
            if (body != null && body.ticket != null && body.ticket.id != null)
            {
              console.log("result", body.ticket.id);
              response.write('[ { "id": 1, "action": "play", "text": "The zendesk create ticket successful ticket number: ' + body.ticket.id+ '" }]');
            }
            response.end('');
            console.log(body);
          });

        function handleError(err) {
            console.log(err);
            process.exit(-1);
        }

      });
    }
The form submission "Data url" is configured with Zendesk API username and password for the Zendesk authentication. The subject and comment fields passed by JSON data in the request body. This sample code use username and password in the url for the Zendesk authentication. There are other options for Zendesk authentication. Please see the Zendesk document for more information. You can find the complete source code at GitHub link.
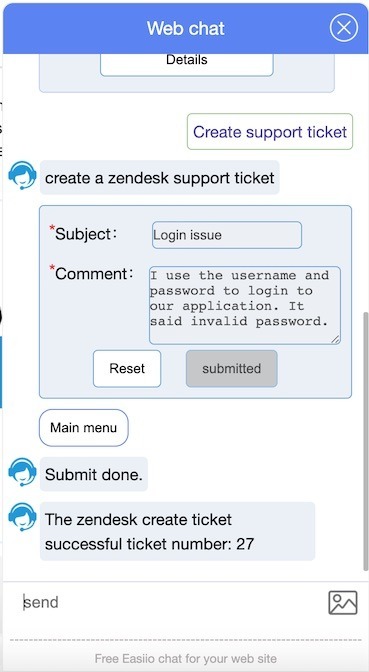
After submission and the results from Zendesk is ok. It will write the JSON response back to Easiio web chat and the response can be displayed as the submission results.
4. Test the node.js code
You can test the Url by running the code locally using comment "node zendesk_tasks.js. Test the code by using a curl command such as following. Please change the username, password and domain according to your Zendesk account.
curl -H "Content-Type:application/json" -X POST -d '{"subject":"My ticket from API","comment":"I have a broken computer and wifi is down."}' 'http://localhost:1341/zendesk_ticket_create?user=last.firstname%40sample.com&pass=mytestpass&domain=mydomain'It should return something like this.
[ { "id": 1, "action": "play", "text": "The zendesk create ticket successful ticket number: 28" }]5. Run it in the chat window
After testing your node.js code and verify it is ok, you can deploy to a server environment. Start testing it with a real Easiio webchat client, assuming you already configure the ITR form to use the correct "Data url" including the correct username and password info for the Zendesk in the url. Open the web page that hosting the ITR script, such as the following picture ("Create support ticket").
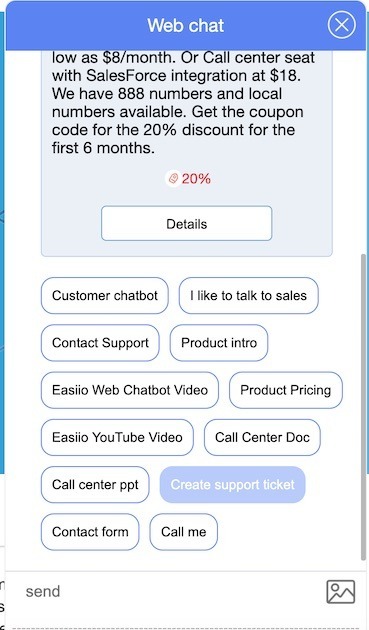
Click the "Create support ticket" menu to open the ticket form. Fill in the information. Click submit to send the form data to the node.js API. After the ticket created, you will see the response from the node.js code showing up in the chat window.
Conclusion
From this example, you can see it is very easy to create a Web chat integration from Easiio webchat form to Zendesk and similarly to other CRM or any third-party applications that support API integration. Easiio web chat is a very powerful integration platform for web site chat. You can signup and use it for free. You can sign up here.
Easiio also provides powerful call center software and business phone systems.
Other related articles:
Twilio API and Easiio Web chat for phone number verification.
Easiio Voice and Chat integration with Hubspot using node.js
